Ionic Local Notifications Part 1: The Hidden Details
Intro
Have you ever wondered by your notifications weren’t working in iOS 10, or why they showed a bell icon or a solid square on Android? If so your answers follow.
My app was originally written in Ionic 1 with ngCordova, but with Ionic 2 now out of beta, I’ve written this tutorial code with Ionic 2 and Ionic Native.
iOS 10
Support
I’ll get this out of the way first because it’s the simplest. When I was working on this project (late last year), and still as of the date I’m writing this, the default Cordova plugin does not support iOS 10. Now, it’s a free open source project, and adding iOS 10 support to the master branch is roadmapped, but if you have a deadline to meet like I did that’s not good enough. Luckily, Telerik’s version of the plugin does, and that was a lifesaver. So for the time being, use it instead. It’s a fork of the original, and works perfectly with Ionic, ngCordova, and Ionic Native.
ionic plugin add https://github.com/Telerik-Verified-Plugins/LocalNotification.git --saveIf you already have the old plugin be sure to remove it first.
Testing
In iOS 10, unlike Android and iOS 9, local notifications will not pop if the app is running in the foreground. It’s very easy to waste a couple hours on this wondering why your notifications don’t work in iOS 10 when they work everywhere else. Guess how I know… 🙂
Icons
In iOS the notification icons are very straightforward, it will show the app icon itself, that is all. In Android though things get much more interesting, so this section focuses on Android specifically
Small Icon
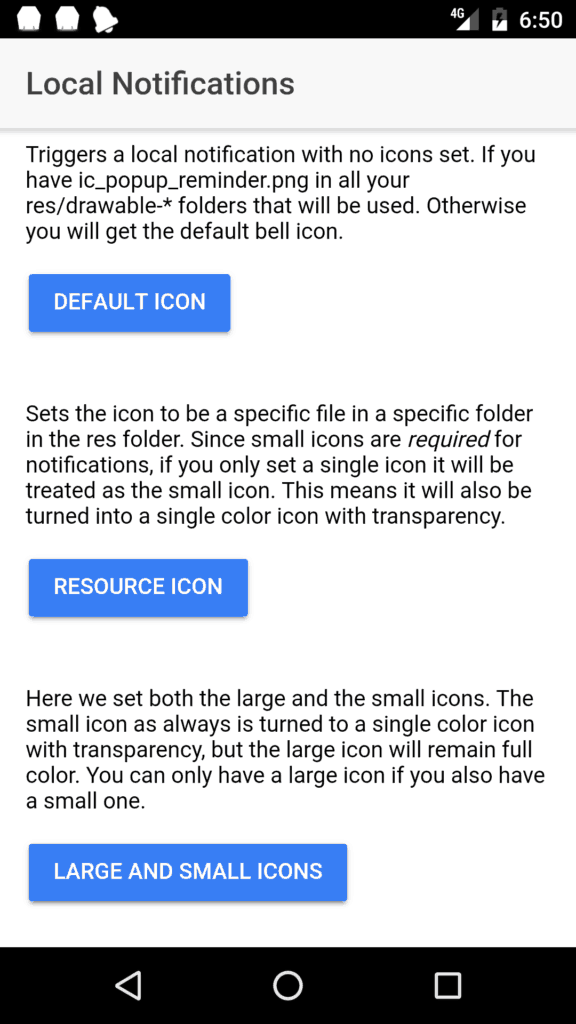
Let’s start with the small icon. The small icon is required for Android notifications. The small icon must also come from the res folder. The small icon is a single color png image who’s look is defined solely by transparency. If you set a small icon with no transparency when you setup your notification, your icon will become a solid square. By default, the smallIcon uses ic_popup_reminder in your res/drawable- folders. If you do not have that file in your res/drawable folders, and you did not specify the location of the smallIcon to a file in your res folder, you will get the default bell icon:
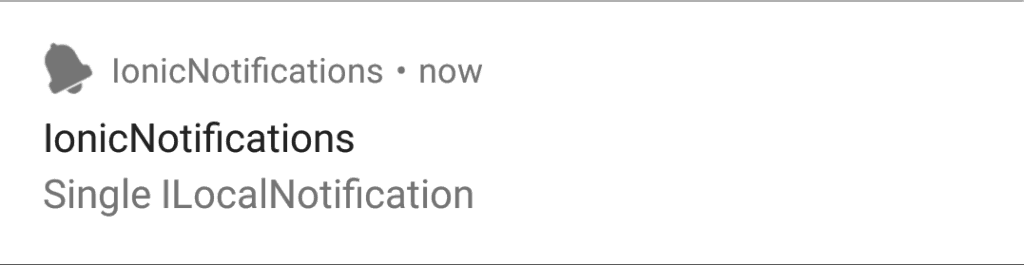
Let’s look at some code. Here since no smallIcon was set, the icon that will appear will be either the ic_popup_reminder.png you’ve placed in all your res/drawable- folders, or the default bell icon.
LocalNotifications.schedule({
  id: 1,
  text: 'No icon set, will use default if present',
  data: { testData: "ABC" },
  at: newDate
});
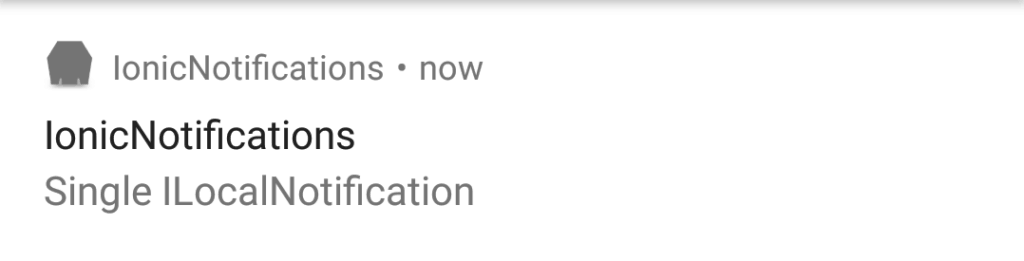
Alternatively, you can set the smallIcon to a specific file in your res folder:
LocalNotifications.schedule({
  id: 1,
  text: 'No icon set, will use default if present',
  data: { testData: "ABC" },
  at: newDate,
  smallIcon: 'res://drawable-hdpi/icon.png',
});
Above I’ve set the smallIcon to the default Cordova icon. Since this is the small icon, it’s stripped of all it’s color so you only see the outline:
Now let’s talk briefly about the color of the small icon. With the Cordova plugin, and with ngCordova, you can actually change the color of your small icon using the color property. However in Ionic Native you cannot, because the service uses a TypeScript interface and color is not defined in it. I have a pull request out to add this feature in, but in the meantime you can add it yourself by adding
color?: string;to the ILocalNotification interface in node_modules/ionic-native/dist/es5/plugins/localnotifications.d.ts
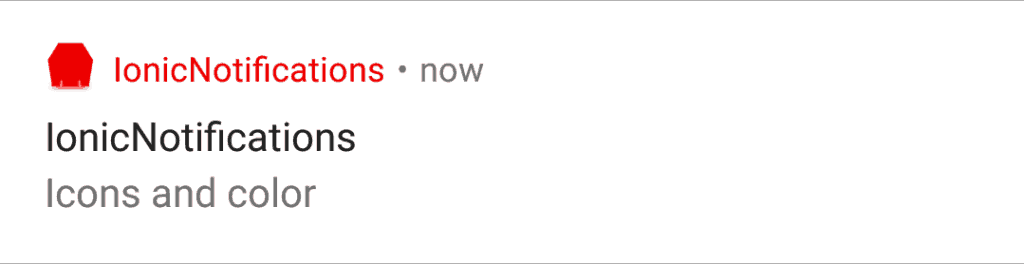
You can then change the color like so:
LocalNotifications.schedule({
  id: 4,
  text: 'Icons and color',
  data: { testData: "ABC" },
  icon: 'res://drawable-hdpi/icon.png',
  smallIcon: 'res://drawable-hdpi/icon.png',
  color: 'FF0000'
});
Here I’ve set the color to be red, resulting in:
Large Icon
The large icon, unlike the small icon, can contain multiple colors, and can be stored in your project’s img or assets folder (depending on if you are using Ionic 1 or 2). It can also come from your res/drawable folders, but it doesn’t have to. In the plugin, the large icon is set via the icon property…except…that’s not completely true. Let’s look at an example:
LocalNotifications.schedule({
  id: 2,
  text: 'Resource icon',
  data: { testData: "ABC" },
  icon: 'res://drawable-hdpi/icon.png',
  at: newDate
});
You might expect that this code would result in a beautiful full color large icon of the the Cordova logo, like:
![]()
But it doesn’t, no large colorful icon appears. Instead you only get the little single color icon. What gives? Remember when I said small icon was required? If you do not specify a smallIcon property, icon is used as the smallIcon. You can only get a large icon if you also have a small one. A little confusing huh? In order to get the small and large icon like you see above, you must do:
LocalNotifications.schedule({
  id: 3,
  text: 'Large and small icons',
  data: { testData: "ABC" },
  icon: 'res://drawable-hdpi/icon.png',
  smallIcon: 'res://drawable-hdpi/icon.png',
  at: newDate
});
Ready to be even more confused? The following code will result in only the default bell small icon:
LocalNotifications.schedule({
  id: 5,
  text: 'Icon from file',
  data: { testData: "ABC" },
  icon: 'file://assets/icon/icon-small.png',
  smallIcon: 'file://assets/icon/icon-small.png',
  at: newDate
});
Can you spot why? The small icon must live in the res/ folder. In order for there to be a large icon, you must have a small icon. Since here I tried to have my smallIcon come from my assets folder, I have no small icon. Since I have no small icon, I cannot have a large icon. I can fix this and get both icons back by doing:
LocalNotifications.schedule({
  id: 5,
  text: 'Icon from file',
  data: { testData: "ABC" },
  icon: 'file://assets/icon/icon-small.png',
  smallIcon: 'res://drawable-hdpi/icon.png',
  at: newDate
});
Notice my small icon now comes from the res folder, while my large icon comes from my regular assets folder. This is the only way to get both to appear.
Conclusion
Check out my sample app that walks through these scenarios, as well as playing a custom sound and passing data to and from a notification: https://github.com/roblouie/ionic-local-notification-examples
Thanks for reading. Questions, thoughts comments? Know something I don’t? Want something specific in part 2? Let me know in the comments below.