Role Based Authentication in Node with MySQL, Passport, Bookshelf, and Express
Intro
When looking for the right tools to build a secured API in Node, Express and Passport seemed like no-brainers. When it came to the ORM though there were a lot of choices and after much googling there was no clear winner. So I actually implemented this small secured API in Sequelize, Waterline, Sails, and Bookshelf to determine which I liked best.
After evaluating all four I decided on Bookshelf because it’s simple to set up and use while still leaving the user lots of options for customization.
You can grab the whole project on github here: user-management-bookshelf
Setup
First you’ll need a database with three tables: user, role, and user_role. This gives you a many-to-many relationship between user and role. This can be set up with Knex migration scripts (Bookshelf is built on top of Knex), however that’s outside the scope of this post. If you want to follow directly along I exported my database here: user-management.sql. That export has two users already in it, Admin and User, each with the generic password Pass1234.
Create a new folder for your app and your app entry point file, I named mine app.js, then run npm init to create your package.json. We’ll be relying on a number of node modules so install them all with npm install.
npm install --save bcrypt bluebird body-parser bookshelf express jwt-simple knex lodash mysql passport passport-jwt
I’ve organized my code into 4 folders: config, controllers, middleware, and models so go ahead and create those directories now.
Finally, as of this writing some of the ES2015 features I use are still behind flags in Node, so be sure to add –harmony-destructuring –harmony_rest_parameters when running Node.
Configure Bookshelf to Connect to MySQL
Create a module to hold the database configuration in the config folder, I named mine database-config.js
module.exports = {
    client: 'mysql',
    connection: {
        host: '127.0.0.1',
        user: 'YOUR_DB_USERNAME_HERE',
        password: 'YOUR_DB_PASSWORD_HERE',
        database: 'YOUR_DB_NAME_HERE'
    }
};
Now we’ll pass our config in to Knex and export our instance of Bookshelf so our models have access to it. Again in the config folder in a file named bookshelf-instance.js:
'use strict';

const dbConfig = require('./database-config');
const knex = require('knex')(dbConfig);

module.exports = require('bookshelf')(knex);
We now have an exposed instance of Bookshelf and can create our models, but first lets quickly create a security-config module to hold some security settings.
module.exports = {
    jwtSecret: 'secret',
    saltRounds: 10
};
The jwtSecret will be used generate our JSON Web Token and saltRounds will be used by bcrypt to generate our salt.
Create User and Role Models with Bookshelf
Let’s take a look at the User model first in models/user.js and after the full code I’ll touch on the interesting bits
'use strict';

const bookshelf = require('../config/bookshelf-instance');
const Promise = require('bluebird');
const bcrypt = Promise.promisifyAll(require('bcrypt'));
const Role = require('./role');
const securityConfig = require('../config/security-config');

module.exports = bookshelf.Model.extend({
    tableName: 'user',
    roles() {
        return this.belongsToMany(Role, 'user_role');
    },
    validPassword(password) {
        return bcrypt.compareAsync(password, this.attributes.password);
    },
    initialize() {
        this.on('saving', model => {
            if (!model.hasChanged('password')) return;

            return Promise.coroutine(function* () {
                const salt = yield bcrypt.genSaltAsync(securityConfig.saltRounds);
                const hashedPassword = yield bcrypt.hashAsync(model.attributes.password, salt);
                model.set('password', hashedPassword);
            })();
        });
    }
});
The first thing I want to draw your attention to are the following two lines:
const Promise = require('bluebird');
const bcrypt = Promise.promisifyAll(require('bcrypt'));
Bluebird (a promise library) has a number of amazing abilities, and here we see promisifyAll. This method will take a module, find any methods that use callbacks and create new versions of those methods that use promises instead. The newly created “promisified” methods will have “Async” appended to them to differentiate them from the original callback methods.
Notice we include the role model even though we haven’t created it yet. We’ll do that next, but for now we include it here so we can set up the many-to-many relationship between user and role with the belongsToMany method, passing in the join table name.
Lets now look at initialize(), a Bookshelf method that is called by the constructor when creating a new instance. Any hooks you want to set up should be added here, and I create a hook for saving:
initialize() {
    this.on('saving', model => {
        if (!model.hasChanged('password')) return;

        return Promise.coroutine(function* () {
            const salt = yield bcrypt.genSaltAsync(securityConfig.saltRounds);
            const hashedPassword = yield bcrypt.hashAsync(model.attributes.password, salt);
            model.set('password', hashedPassword);
        })();
    });
}
We use the “saving” hook to encrypt the password whenever a user is created or their password is changed. Since we don’t want to double encrypt a password, if the password hasn’t changed we exit immediately.
Bookshelf’s hooks are promise aware which means if the hook returns a promise Bookshelf will wait to save to the database until after the promise resolves. We need to return a promise since we have to wait for the password to be encrypted.
Rather than using something horrible like nesting promises, or the much better but still ugly in this case .all method, we use Bluebird’s great coroutine method. Coroutine takes a generator, and whenever “yield” is used, it will wait to execute the next line until after the called async method has resolved. This lets us write really clean code. Coroutine actually returns a function that returns a promise, so we call it by adding () at the end of the call.
Now let’s create the much simpler Role model:
'use strict';

const bookshelf = require('../config/bookshelf-instance');
const User = require('./user');

module.exports = bookshelf.Model.extend({
    tableName: 'role',
    users() {
        return this.belongsToMany(User, 'user_role');
    }
});
Passport JWT Authentication
Now we need to authenticate a user by username and password and generate a JSON Web Token for that user. Then we’ll configure passport to use that JWT for authentication. Let’s create auth-controller.js in the controllers folder to handle user creation and token generation:
'use strict';

const express = require('express');
const jwt = require('jwt-simple');
const Promise = require('bluebird');
const User = require('../models/user');
const securityConfig = require('../config/security-config');

const router = express.Router();

router.post('/login', (req, res) => {
    const {username, password} = req.body;
    Promise.coroutine(function* () {
        const user = yield User.where('username', username).fetch();
        const isValidPassword = yield user.validPassword(password);
        if (isValidPassword) {
            const token = jwt.encode(user.omit('password'), securityConfig.jwtSecret);
            res.json({success: true, token: `JWT ${token}`});
        } else {
            res.json({success: false, msg: 'Authentication failed'});
        }
    })().catch(err => console.log(err));
});

router.post('/register', (req, res) => {
    const {username, password} = req.body;
    User.forge({username, password}).save()
        .then(user => res.json(user.omit('password')));
});

module.exports = router;
Lets look at the login method. We use destructuring to get the username and password out of the request body. We then use our Bookshelf User model to find a user based on the passed in username. We check for a matching password and return a JWT built from the user model minus the password. JWT will use our jwtSecret to encrypt the user object and return the token.
Now back in the config folder we configure Passport to use our JWT to find a user. If a user is found, Passport puts the user on the request object and considers the user authenticated. If no user is found or an error occurs Passport will return 401 unauthorized.
'use strict';

const passport = require('passport');
const JwtStrategy = require('passport-jwt').Strategy;
const ExtractJwt = require('passport-jwt').ExtractJwt;
const securityConfig = require('./security-config');
const User = require('../models/user');

module.exports = function() {
    const opts = {};
    opts.jwtFromRequest = ExtractJwt.fromAuthHeader();
    opts.secretOrKey = securityConfig.jwtSecret;
    passport.use(new JwtStrategy(opts, function(jwt_payload, done) {
        User.where('id', jwt_payload.id).fetch({withRelated: 'roles'})
            .then(user => user ? done(null, user) : done(null, false))
            .catch(err => done(err, false));
    }));
};
Passport will decrypt the JWT and find a matching user. Notice that we fetch the user with it’s related roles. Since passport puts the user object onto the request, getting the roles now means we can very easily do our role based authentication.
Test What We Have So Far
Lets hook the auth-conroller up in app.js, start node, and test our login method. If you didn’t use my database setup you can also use the register method to create new users.
Hooking things up in app.js:
'use strict';

const express = require('express');
const bodyParser = require('body-parser');
const passport = require('passport');
const configurePassport = require('./config/passport-jwt-config');
const authController = require('./controllers/auth-controller');

const app = express();
app.use(passport.initialize());
configurePassport();
app.use(bodyParser.urlencoded({ extended: false }));
app.use(bodyParser.json());

app.use('/auth', authController);

app.listen(3000);
Now lets use Postman to check it out. If I hit the login endpoint with my username and password I get the token back:

Secured Endpoint and Role Checking
So, everything is in place, we just need to actually secure an endpoint. For that I create a new controller user-controller:
'use strict';

const express = require('express');

const router = express.Router();

router.get('/securedArea', passport.authenticate('jwt', { session: false }), (req, res) => {
    res.json({msg: "You made it to the secure area"});
});

module.exports = router;
If you hook this up back in app.js you can now test your security. I hooked this controller up to /users and then used postman like so:

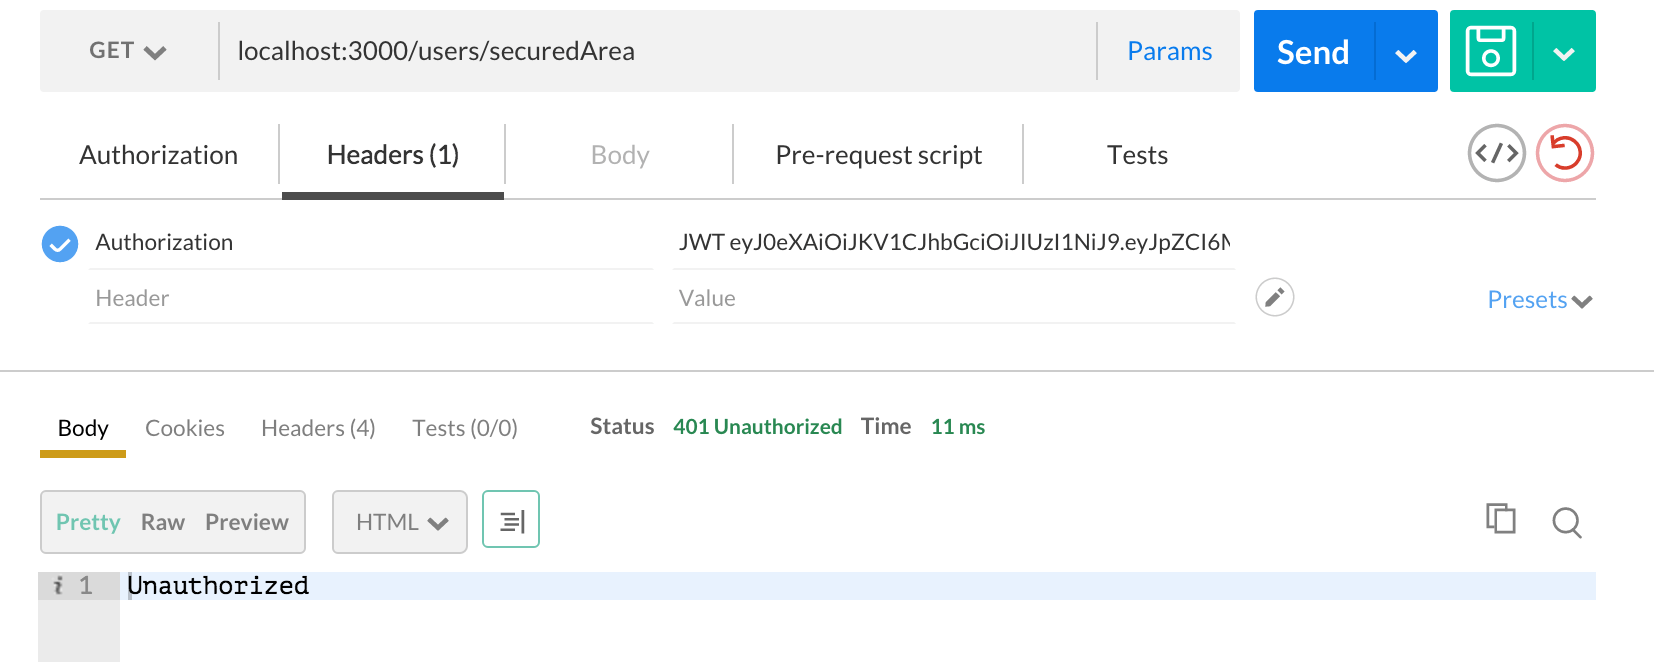
Notice I copied the token value I got back from authentication and put it in the headers under Authorization. You can see that I got in. However, if I delete a couple characters from the token making it undecryptable I get:
Cool, so, we have a secured endpoint, what about roles? Let’s add roles-authorize.js to the middleware folder. This file will hold middleware that takes roles as arguments, then gets the user off of the request and checks if that user’s roles match the roles passed in:
const _ = require('lodash');

module.exports = function(...authorizedRoles) {
    return function (req, res, next) {
        const currentUserRoles = req.user.related('roles').models.map(role => role.attributes.authority);
        if (!_.intersection(currentUserRoles, authorizedRoles).length) {
            res.status(403);
            res.send('Not permitted');
            return;
        }
        next();
    }
};
I’m using rest parameters here so that any number of arguments can be passed in and they will be store in an array. The idea is that you can pass in role names like so authorizedRoles(‘ROLE_ADMIN’, ‘ROLE_USER’), and both of those role names will end up in authorizedRoles.
Since I only care about the role names and not the whole role objects, I take the array of roles related to the current user and use .map to build an array of just the role names.
Then it’s as simple as checking if there is an intersection between the role names the user has, and the role names we allow. If no intersection exists we return 403 Not permitted.
Now back in the user controller we can specify allowed roles by importing our roles-authorize middleware and using it after Passport’s JWT authentication:
'use strict';

const express = require('express');
const User = require('../models/user');
const jwtAuth = require('../middleware/jwt-authenticate');
const authorizedRoles = require('../middleware/roles-authorize');

const router = express.Router();

router.get('/securedArea', passport.authenticate('jwt', { session: false }), authorizedRoles('ROLE_ADMIN'), (req, res) => {
    res.json({msg: "You made it to the secure area"});
});

module.exports = router;
In this case we limit this endpoint to admins only. You could allow more roles by simply passing in more roles to the function.
Final Test
Ok, lets test this out. Here I try to hit the endpoint with a token generated from User instead of Admin like before:

Wrap Up
And there you have it. A secure API with roles in only about 100 lines of code. This was the best system I came up with after much experimentation and searching. Do you have different ideas? Suggestions for improvements? Found an error in the code? Let me know in the comments below.